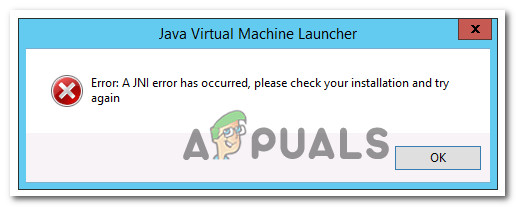
Error : a Jni Error Has Occured
Some Minecraft users are seeing an error whenever they attempt to launch the client (the game) or the server (.jar). The error message that comes up is: "A JNI fault has occurred, delight check your installation and try again". This problem is mostly reported to occur with version Minecraft version 21w19a and newer and it'southward confirmed to appear on Windows 7, Windows 8.1, Windows 10, and Windows eleven.
Equally it turns out, there are multiple causes that might trigger this mistake when sure users attempt to launch Minecraft and about each of them is related to the Java installation.
Here's a listing of possible culprits that are nigh likely responsible for causing the "A JNI fault has occurred, delight check your installation and try again":
- Java xvi JDK is missing – If you become this error while attempting to launch Minecraft build 21w19 or newer, the outset thing yous should do is check if the Coffee 16 JDK installation is missing from your PC. This is the most popular reason why this error is encountered when launching Minecraft on PC. If the Java 16 JDK is missing from your figurer installation, download and install it from the official channels.
- Broken Organization Path for Java – Every bit it turns out, another reason why y'all can expect to see this error is a scenario in which the organization variable path for java is broken and tricks the Minecraft launcher into believing that Java is non installed on your PC when information technology actually is. If this scenario is applicative, y'all should be able to fix the issue by removing the broken organization PATH variable from the Surround variables.
Install the latest Coffee JDK version
In most documented cases, this particular mistake happens when you attempt to launch Minecraft or a Minecraft server on a PC that doesn't accept Java 16 or newer installed. Keep in mind that starting with Minecraft build 21w19, you will need to have Coffee's 16 JDK version installed on your PC, otherwise, the game will not launch.
To fix this upshot, you volition simply need to update your current Java JDK to the nigh recent version available using the official channels.
If y'all're looking for step by step instructions on how to practice this, follow the guide below:
- Ensure that the Minecraft launcher (Tlauncher or whatever other) is completely closed earlier moving to the next footstep below.
- Open your default browser and visit the download folio of the Java 15 Development kit.
- Once you're inside, make sure the Windows tab is selected, then ringlet all the style down to the Windows x64 Compressed archive and click on the acquaintance Download hyperlink.
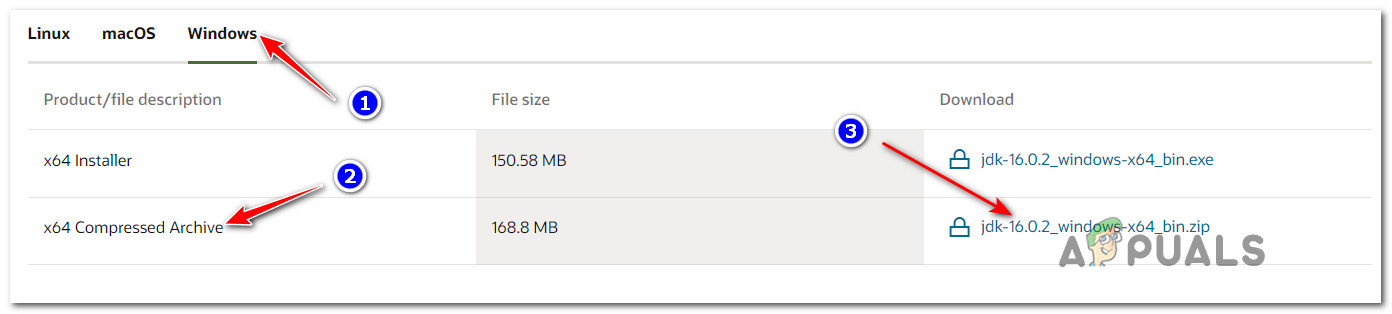
Downloading the x65 compressed annal of the Java 16 JDK - At the confirmation prompt, check the box associated with I reviewed and accept the Oracle Technology Network License Understanding for Oracle Java SE, and then click on the Download push button below.
- Look until the download is complete, then unpack the zippo annal with WinZip, WinRar, 7Zip or the born equivalent and look for the operation to consummate.
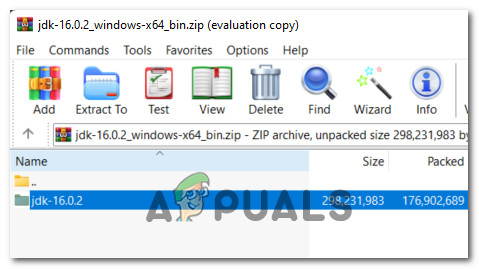
Unzip the Java JDK - One time the extraction procedure is consummate, navigate to the location where you extracted the JDK and copy it on your clipboard by right-clicking on it and choosing Copy from the context carte du jour.
- Adjacent, use File Explorer (My Computer) to navigate to the following location and paste the JDK sixteen folder that you previously copied:
C:\Program Files\Java
- Wait until the copying operation is complete, then close the window and double-click on your Minecraft launcher over again (TLauncher or other).
- One time you're inside the launcher, click on the settings icon, then click on Settings from the context bill of fare.
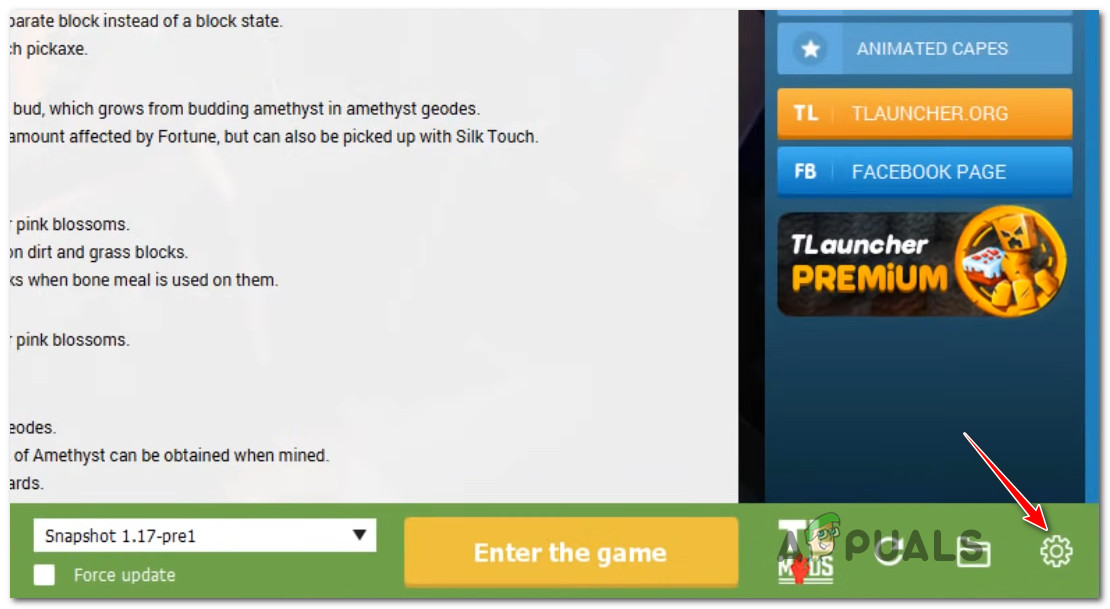
Accessing the Settings menu of the Minecraft launcher - Inside the Settings menu, ensure that the Minecraft Settings is selected at the top, and so click the Browse button associated with Java path.
- Adjacent, apply the browse window to navigate to the following location:
C:\Programme Files\Java\jdk-16.0.ii\bin
- Once inside, make certain that javaw.exe is selected before clicking the Open up button.
- Finally, click on the Save button to successfully save the java path in your Minecraft launcher.
- Launch the game normally and you lot should come across the upshot stock-still.
If the trouble is yet not resolved, move down to the adjacent potential set below.
Remove the broken System Path variable for Java
If the first method was non constructive in your instance, the next thing you lot should investigate is a potentially broken system variable used by Java.
A broken variable tin can exist the determining factor in 'tricking' your Minecraft launcher into believing that the Java JDK requirement for the game is not installed when information technology actually is.
In this case, you can get the issue resolved by accessing the Organization Properties screen and modifying the Environs variables in a style that the Java PATH environment is removed.
This set up has been confirmed to be constructive for a lot of Minecraft users that we're encountering the "A JNI fault has occurred, please check your installation and endeavor again" when attempting to launch the game from a defended launcher.
Follow the instructions below for a step-by-stride guide that will guide you lot through the procedure of removing the corrupted Coffee JDK path variable:
Notation: The instructions beneath should piece of work on every recent Windows version including Windows 7, Windows eight.i, Windows x, and Windows 11.
- Press Windows cardinal + R to open up upwardly a Run dialog box. Adjacent, type 'sysdm.cpl' inside the text box and printing Enter to open the Organisation Backdrop window.
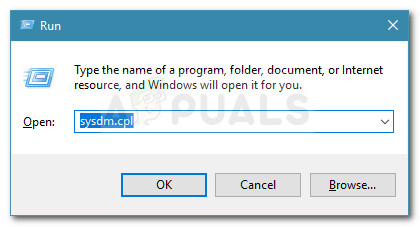
Open up the System Backdrop window Note: If you are prompted by the User Account Control prompt, click Aye to grant admin access.
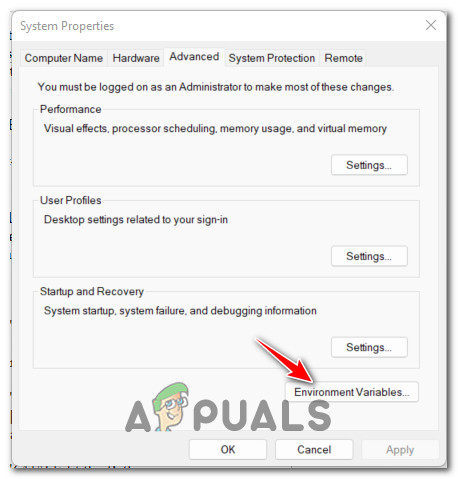
- Once you're finally inside the Organisation Properties window, click on the Advanced tab, so click on Environment variables(nether Startup and Recovery).
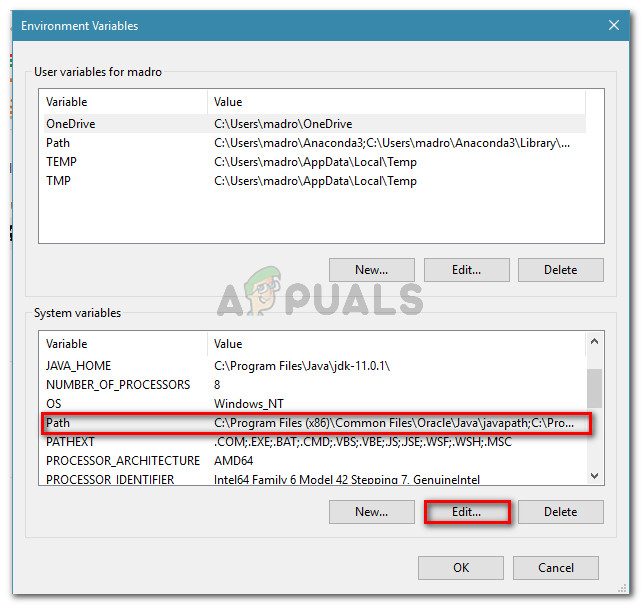
Open up up System Variables carte du jour - One time you're inside the System Variables window, go to Organisation Variables, and then choose Path and click on Edit.
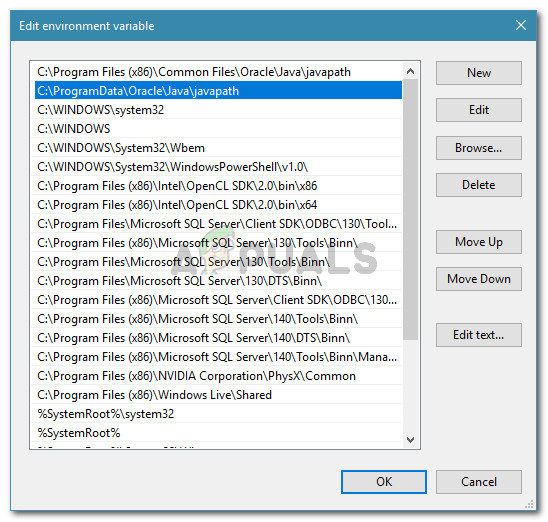
Editing the path variable - Next, once you're within the Edit environment variable window, get ahead and look for an environment variable that mentions java.
- One time yous spot the culprit, click on information technology one time to select it, and so click Delete to get rid of it.
Deleting the java environs variable - In one case the problematic environs variable has been deleted, reboot your PC, then start Minecraft again and see if the "A JNI fault has occurred, please cheque your installation and endeavor again" issue is now fixed.
![]()
Source: https://appuals.com/a-jni-error-has-occurred-minecraft/
0 Response to "Error : a Jni Error Has Occured"
Post a Comment